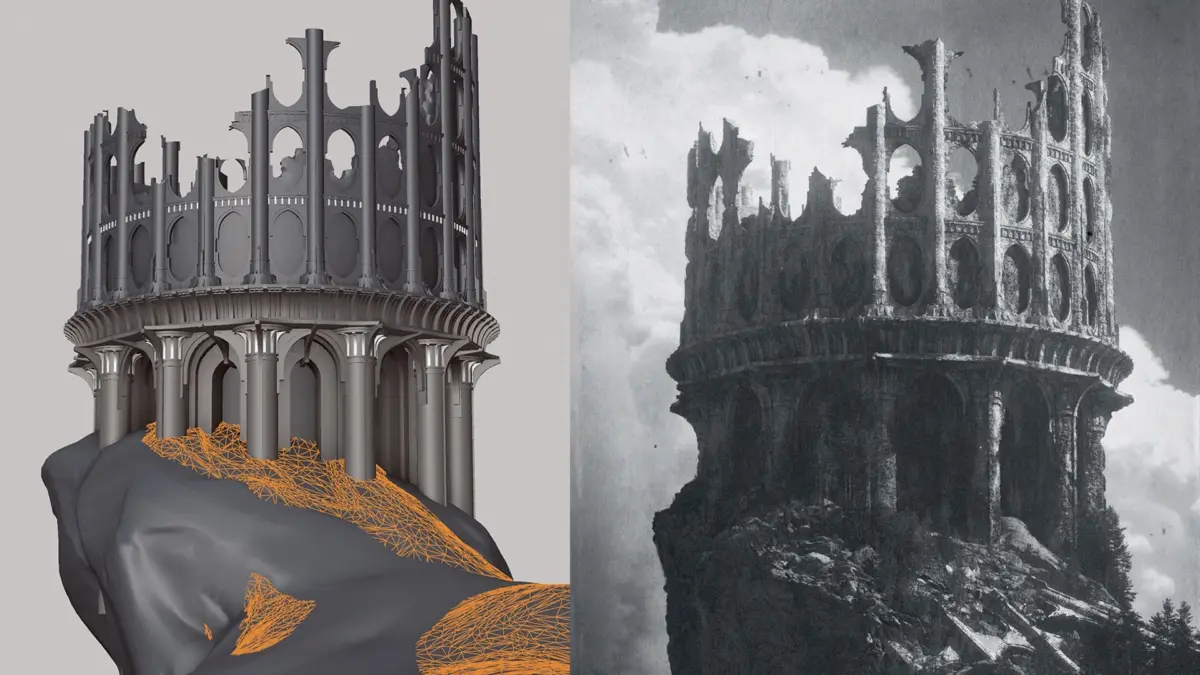
Creating expansive, highly detailed digital environments is often viewed as one of the most demanding disciplines in digital art. For freelance sci-fi and fantasy artist Calder Moore, constructing immersive world spaces requires balancing technical efficiency with creative storytelling. Specializing in stylized, moody landscapes, Moore relies on a structured workflow that combines concept sketching, 3D modeling, high-displacement texturing, atmospheric lighting, and digital paintover techniques.
Using a software pipeline anchored by Cinema 4D, ZBrush, Octane Render, and Adobe Photoshop, Moore demonstrates how complex virtual environments can be built efficiently without sacrificing visual depth or emotional resonance. By systematically breaking down the production pipeline into distinct phases, artists can overcome the daunting scope of large-scale visual development and maintain focus on narrative artistic decisions.
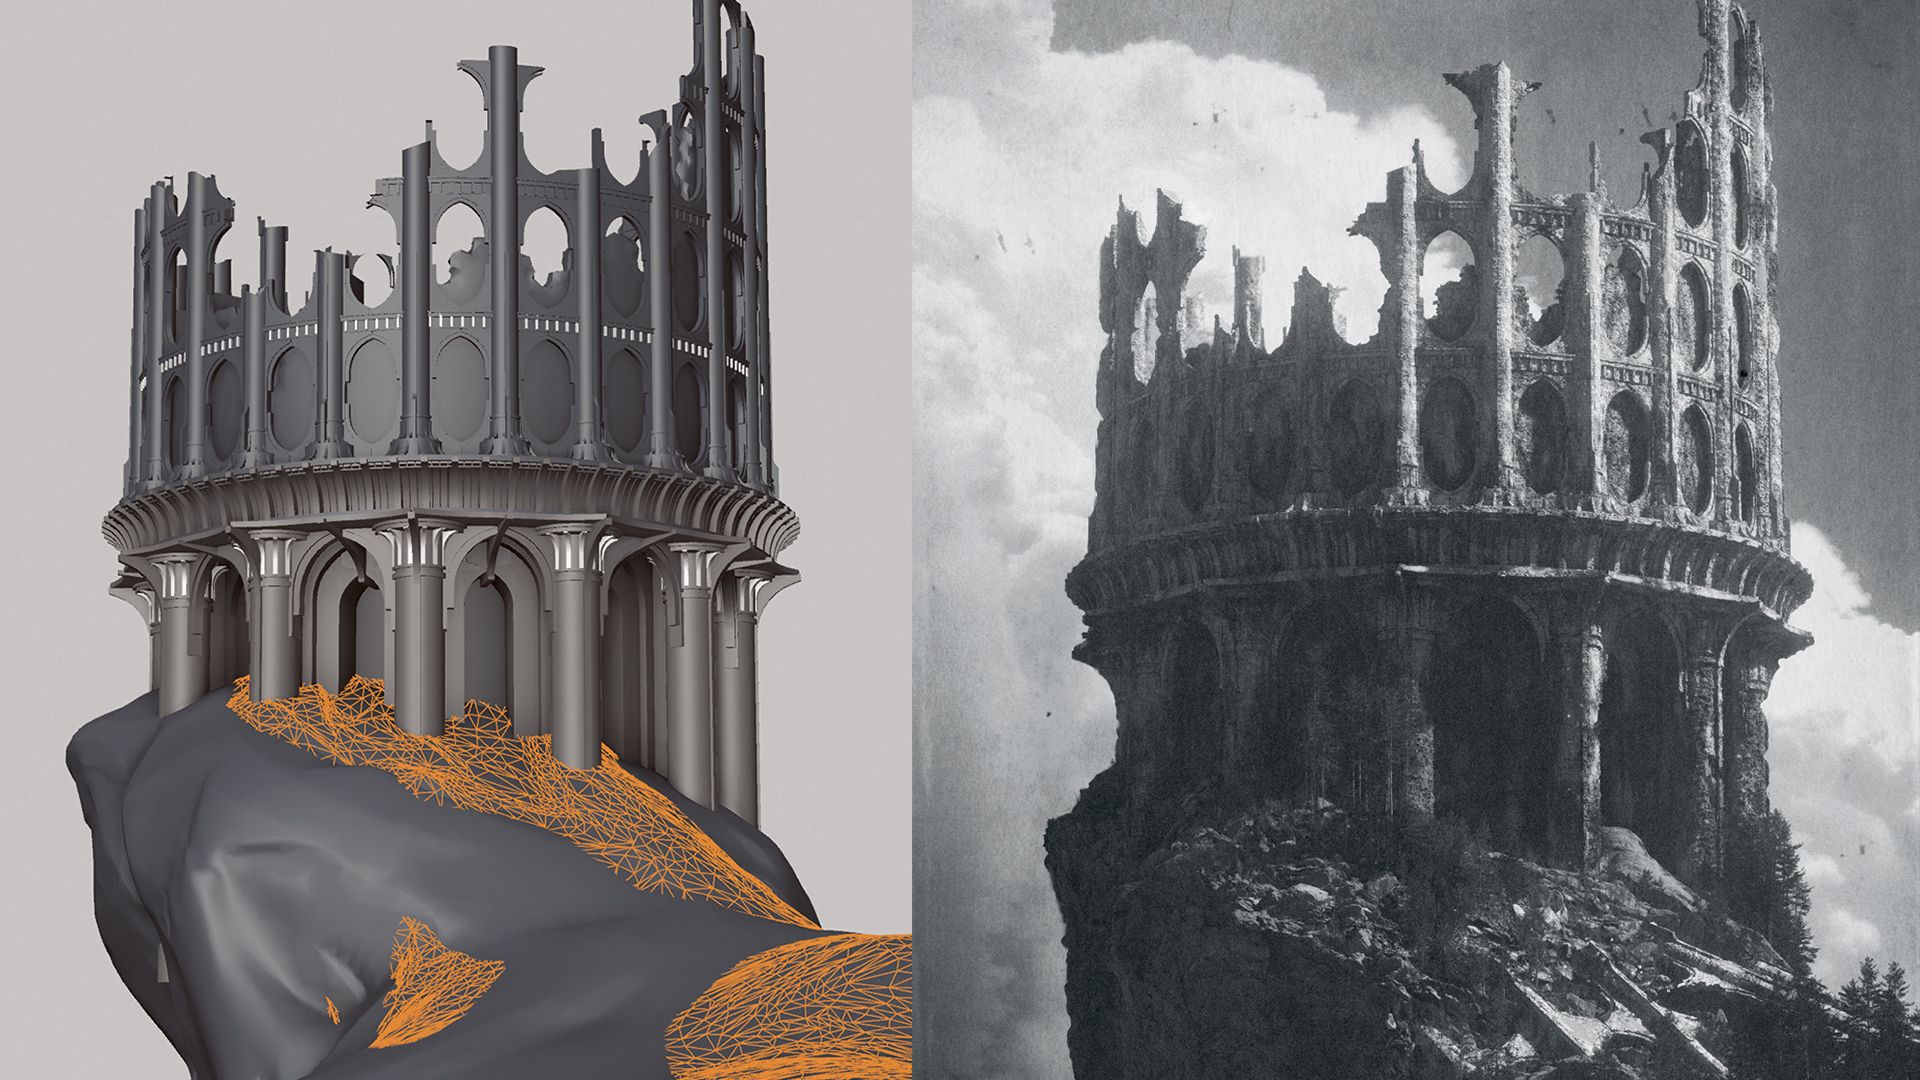
Pre-Production Strategy and Asset Management
Before launching into complex 3D software, the foundation of a successful digital landscape relies on thorough preparation and conceptual clarity. For Moore, the initial phase of any project begins with assembling a visual palette. Gathering reference imagery focused on architecture, geological formations, lighting setups, spatial composition, and overall mood provides a clear aesthetic compass for the production process.
To prevent technical bottlenecks from disrupting creative momentum later in the build, Moore advocates for pre-building modular asset libraries. By developing pre-configured foliage scatter systems—including various trees, shrubs, and grass models—and maintaining a repository of tileable surface materials in advance, the artist can bypass repetitive technical setups during the active scene-building phase. This asset-first mindset allows the creator to focus entirely on composition, lighting, and environmental storytelling.
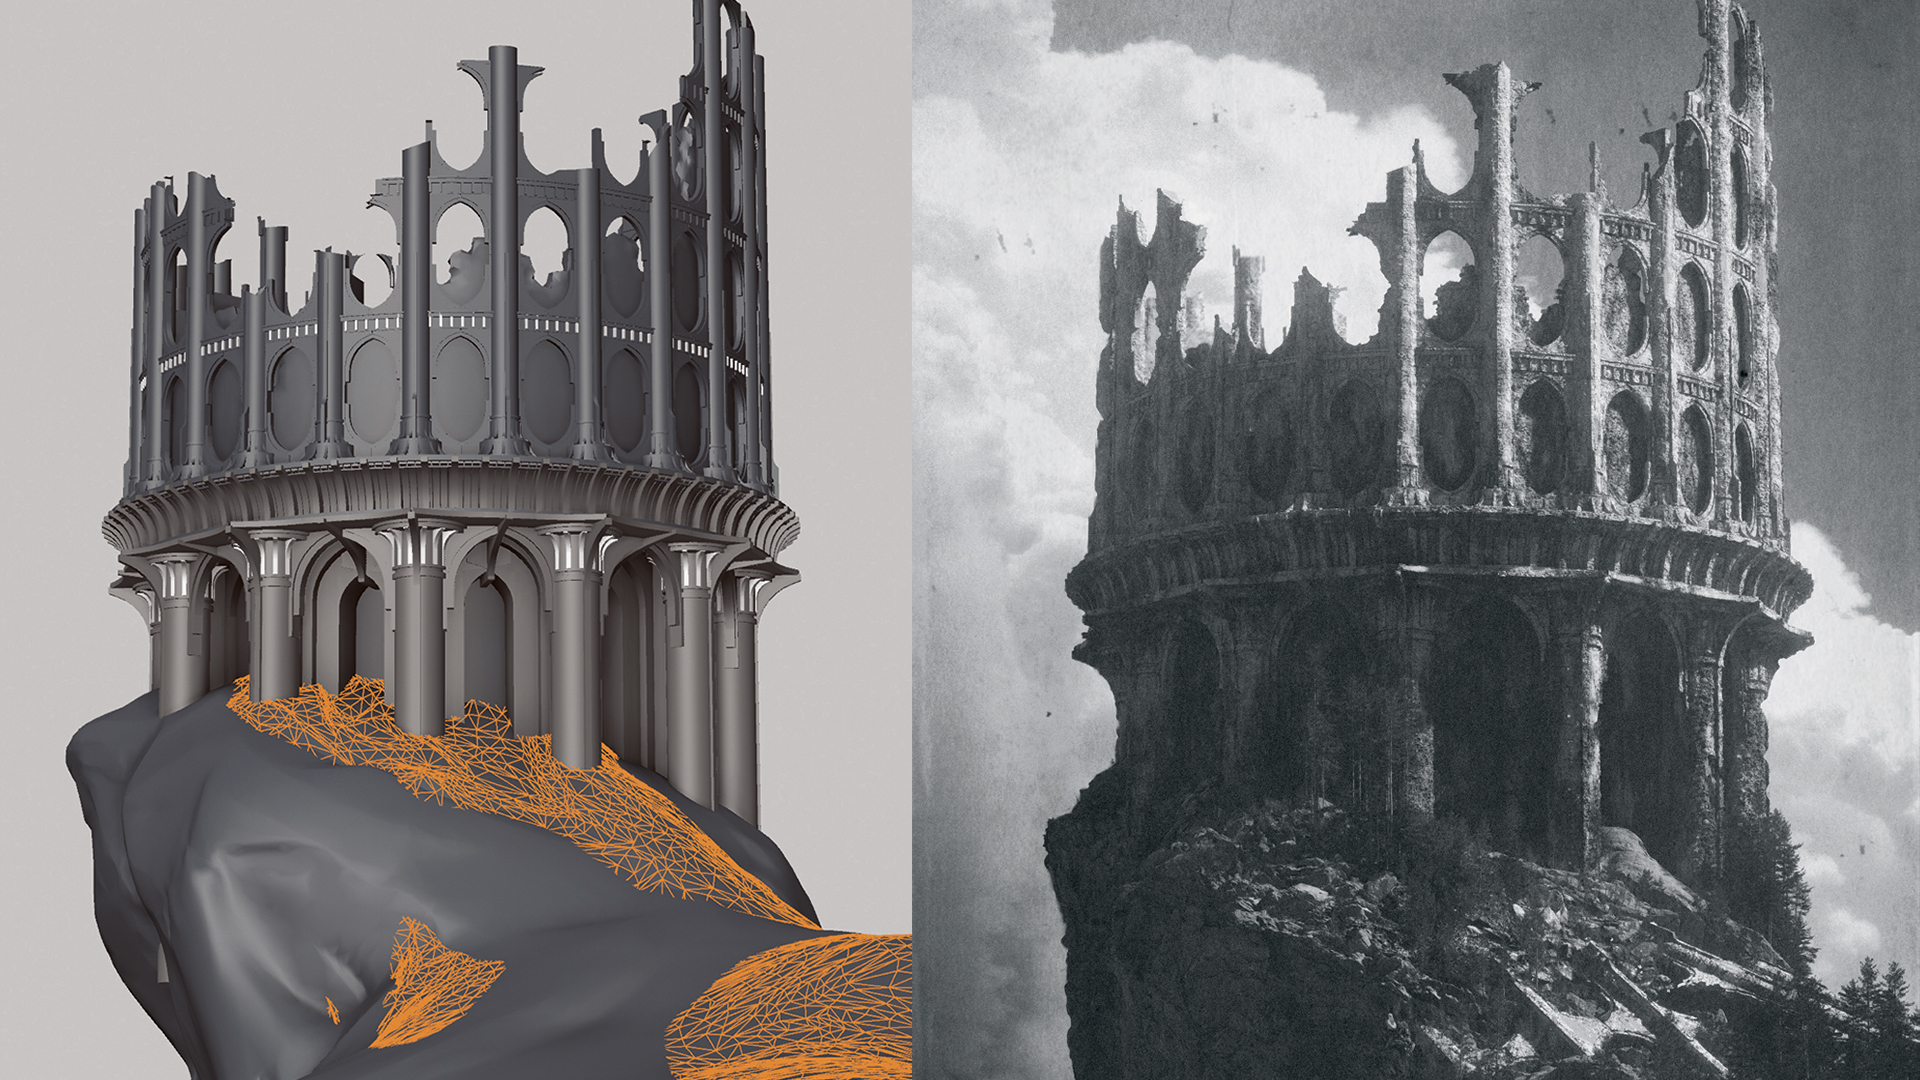
Recognizing that massive 3D projects can easily become overwhelming, Moore approaches scene construction by dividing the workload into micro-tasks. Rather than treating an environment as a single colossal effort, the build is mapped out as a sequence of isolated objectives—such as modeling a structural tower, simulating its destruction, shaping the terrain mesh, and detailing ground surfaces. Breaking the overall design into smaller, actionable components transforms an intimidating creative process into a manageable workflow.
+-----------------------------------------------------------------------+
|                       PRE-PRODUCTION & PLANNING                       |
|   Visual Palette Gathering  |  Asset Libraries  |  Task Breakdown    |
+-----------------------------------------------------------------------+
                                   |
                                   v
+-----------------------------------------------------------------------+
|                        CONCEPT & 3D BLOCKOUT                          |
|   Thumbnail Sketching  |  Primitive Geometry  |  Camera Locking       |
+-----------------------------------------------------------------------+
                                   |
                                   v
+-----------------------------------------------------------------------+
|                    ARCHITECTURAL & TERRAIN WORK                       |
|   Displacement Maps  |  Voronoi Fracture  |  ZBrush Sculpting         |
+-----------------------------------------------------------------------+
                                   |
                                   v
+-----------------------------------------------------------------------+
|                    ECOSYSTEM & LIGHTING INTEGRATION                   |
|   Vertex Scatter Maps  |  HDRI Environments  |  Value Testing (B&W)   |
+-----------------------------------------------------------------------+
                                   |
                                   v
+-----------------------------------------------------------------------+
|                     RENDERING & POST-PROCESSING                       |
|   Multi-Pass Output  |  2D Paintover Finish  |  Film Grain & Textures |
+-----------------------------------------------------------------------+
Conceptual Thumbnailing and Initial Scene Blockout
The creative execution begins far from the 3D viewport. Quick, small-scale thumbnail sketches serve as the primary tool for testing compositional ideas and establishing visual hierarchy. During this preliminary stage, Moore iterates rapidly across several thumbnail variations to explore framing options and visual flow. For this specific project, the goal was to capture the mood of an ancient, forgotten ruin—dominated by a solitary tower that conveys a sense of fallen power.
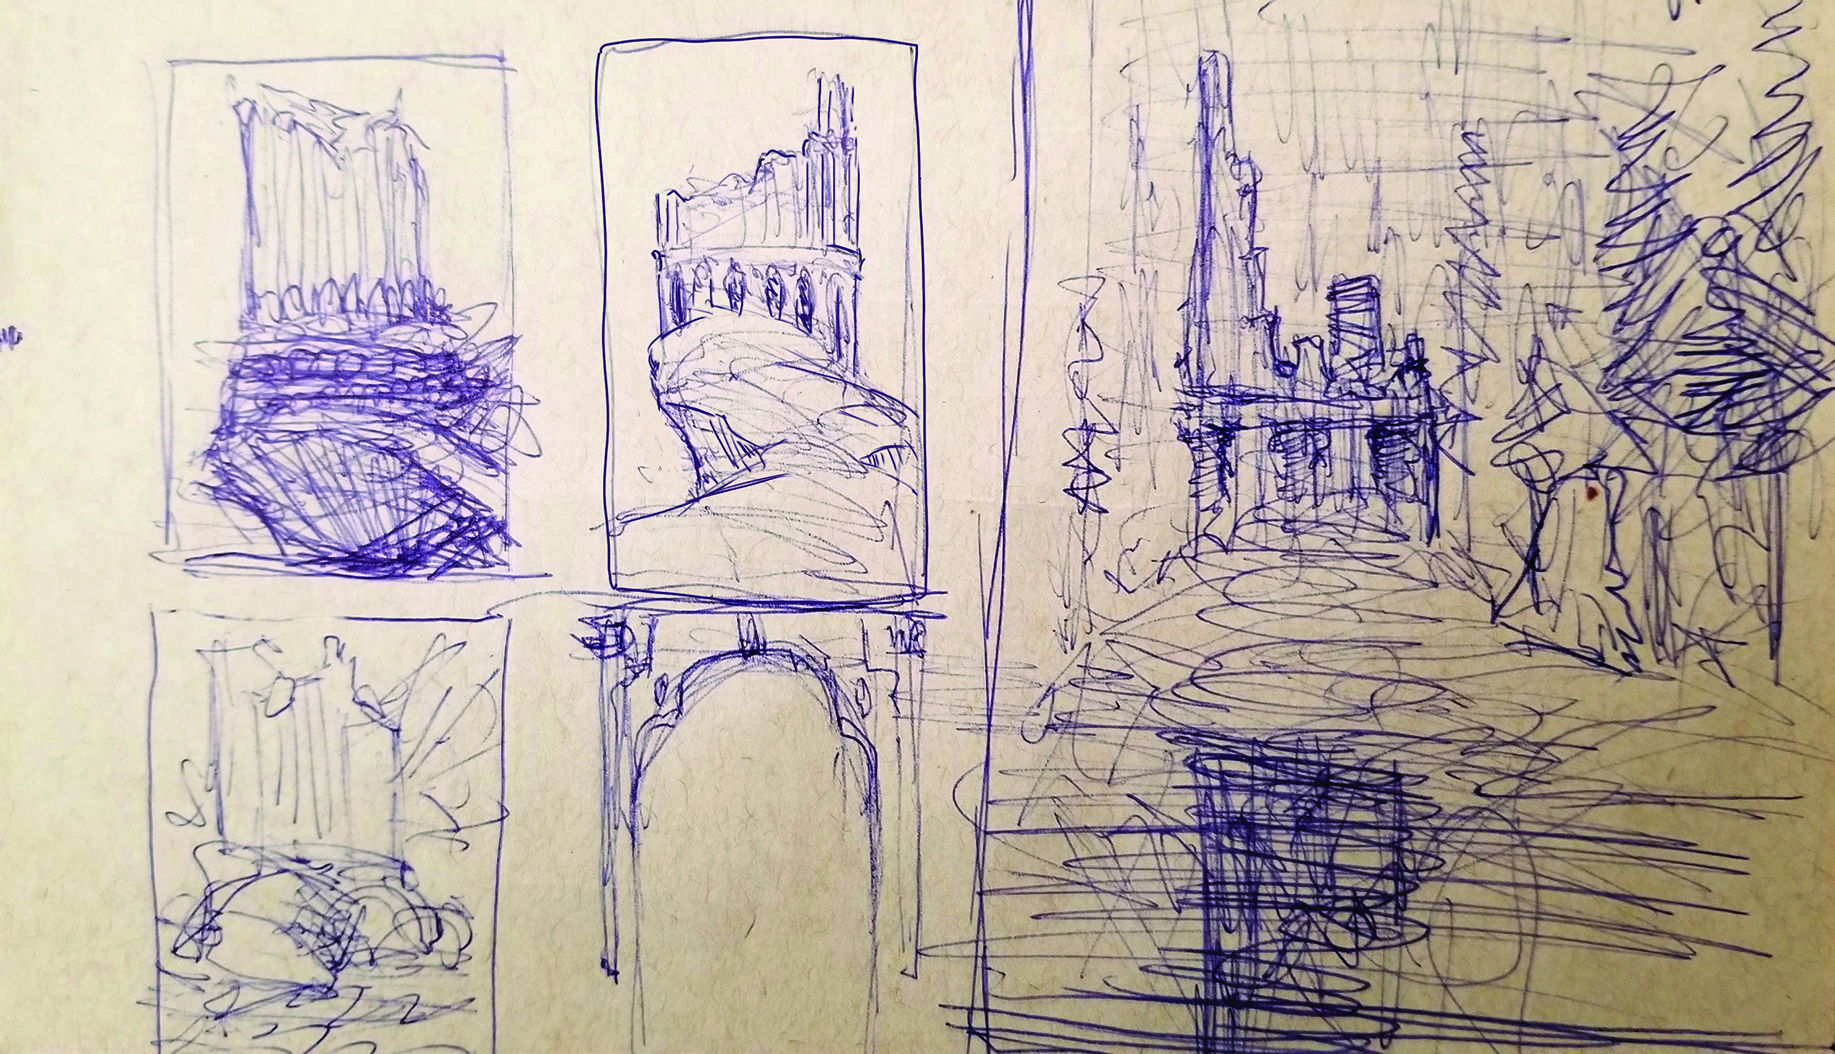
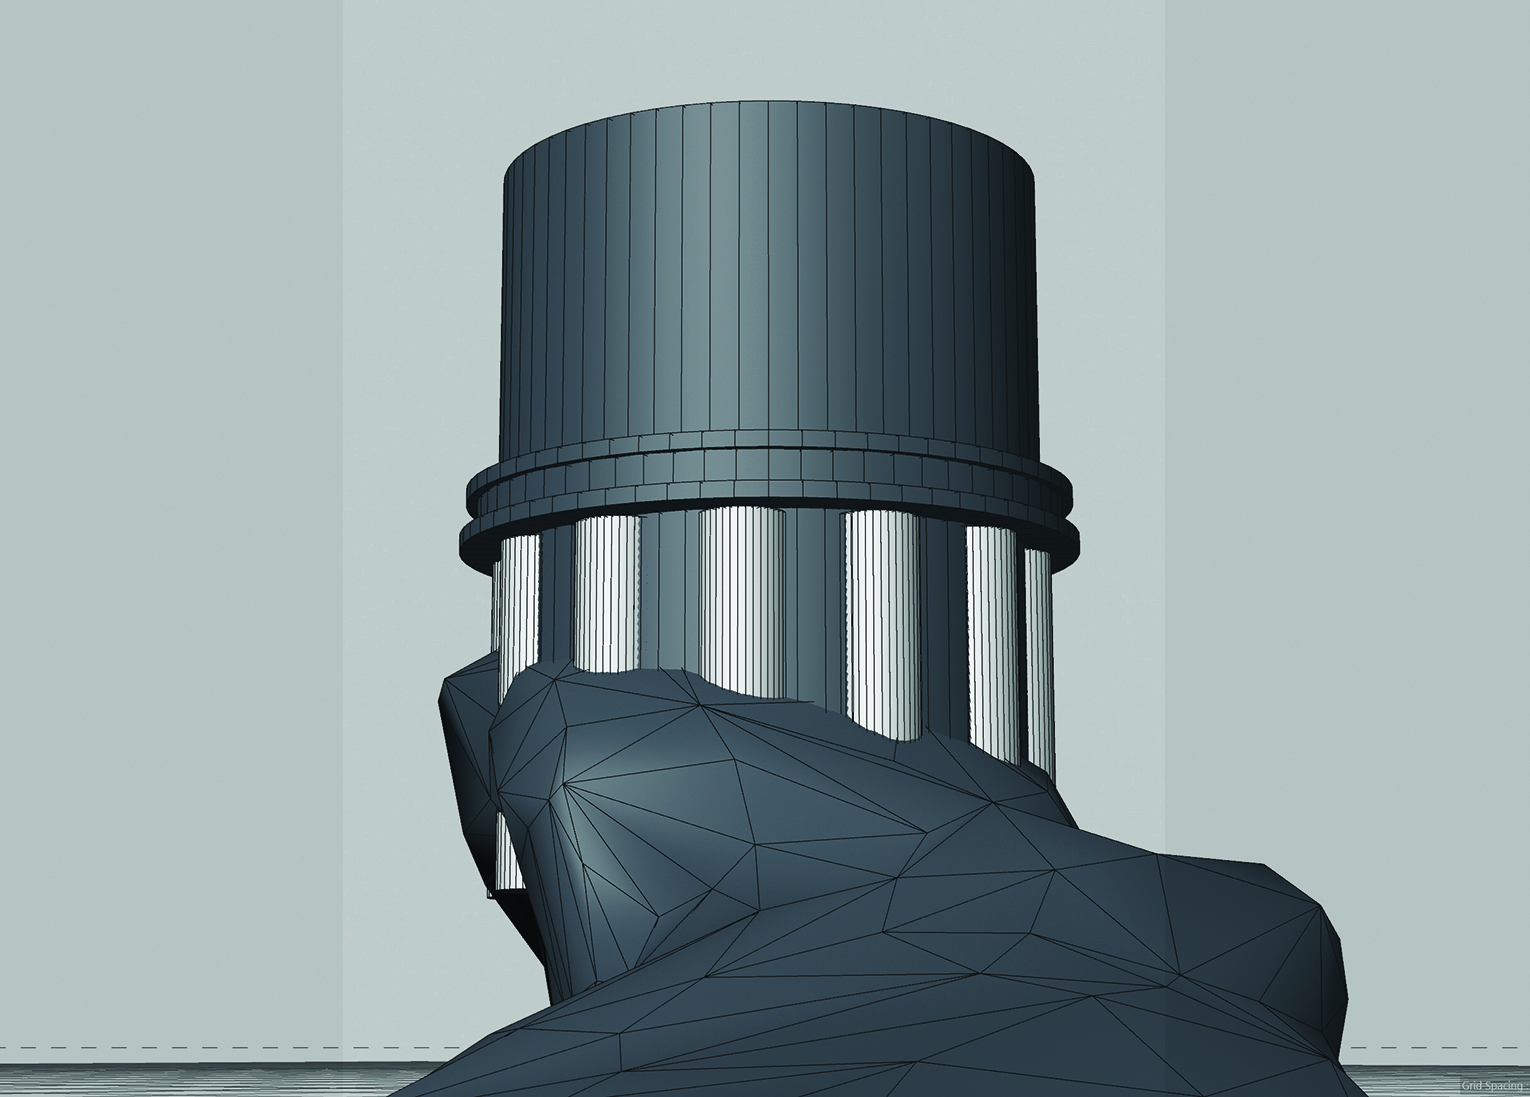
Once the conceptual direction is established, the work transitions into Cinema 4D for the initial 3D blockout. Using primitive 3D geometry and elementary sculpting tools, Moore constructs the primary silhouettes of the landscape and the structural footprint of the focal tower.
A critical step during this early phase is locking down the virtual camera position. Establishing the final camera angle early in the production cycle prevents wasted effort on detailing areas of the scene that will ultimately fall outside the render frame. Locking the perspective ensures that every subsequent modeling choice, texture placement, and light source directly enhances the final composition.
Architectural Modeling and Controlled Structural Destruction
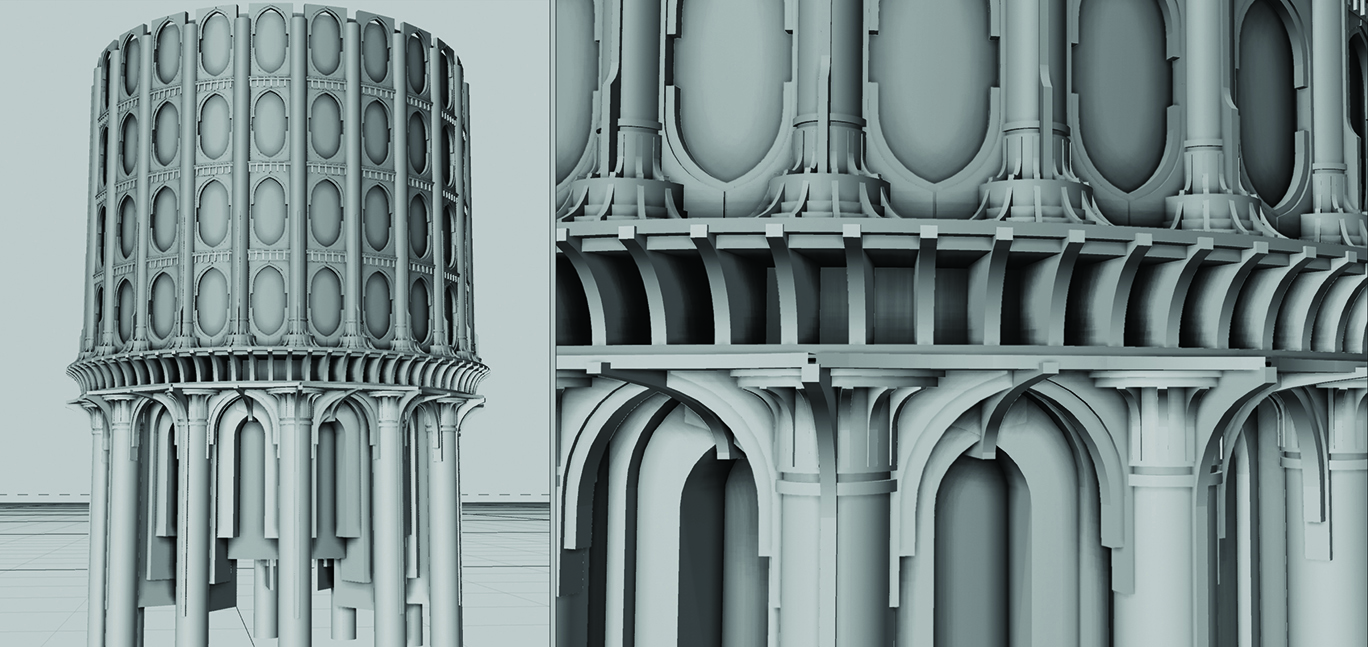
With the initial scene blocking complete, focus shifts toward building out architectural assets. To keep viewport performance smooth and geometry lightweight, Moore relies heavily on displacement textures rather than dense manual modeling to generate intricate surface details.
The structure of the main tower is constructed by assembling basic geometric shapes. Architectural elements such as archways are built using symmetry tools, while repeating structures like columns and outer pillars are placed using radial cloners. Once a single structural segment is finalized, radial cloning is applied to duplicate the components around a central axis, quickly producing a tall, detailed circular tower.
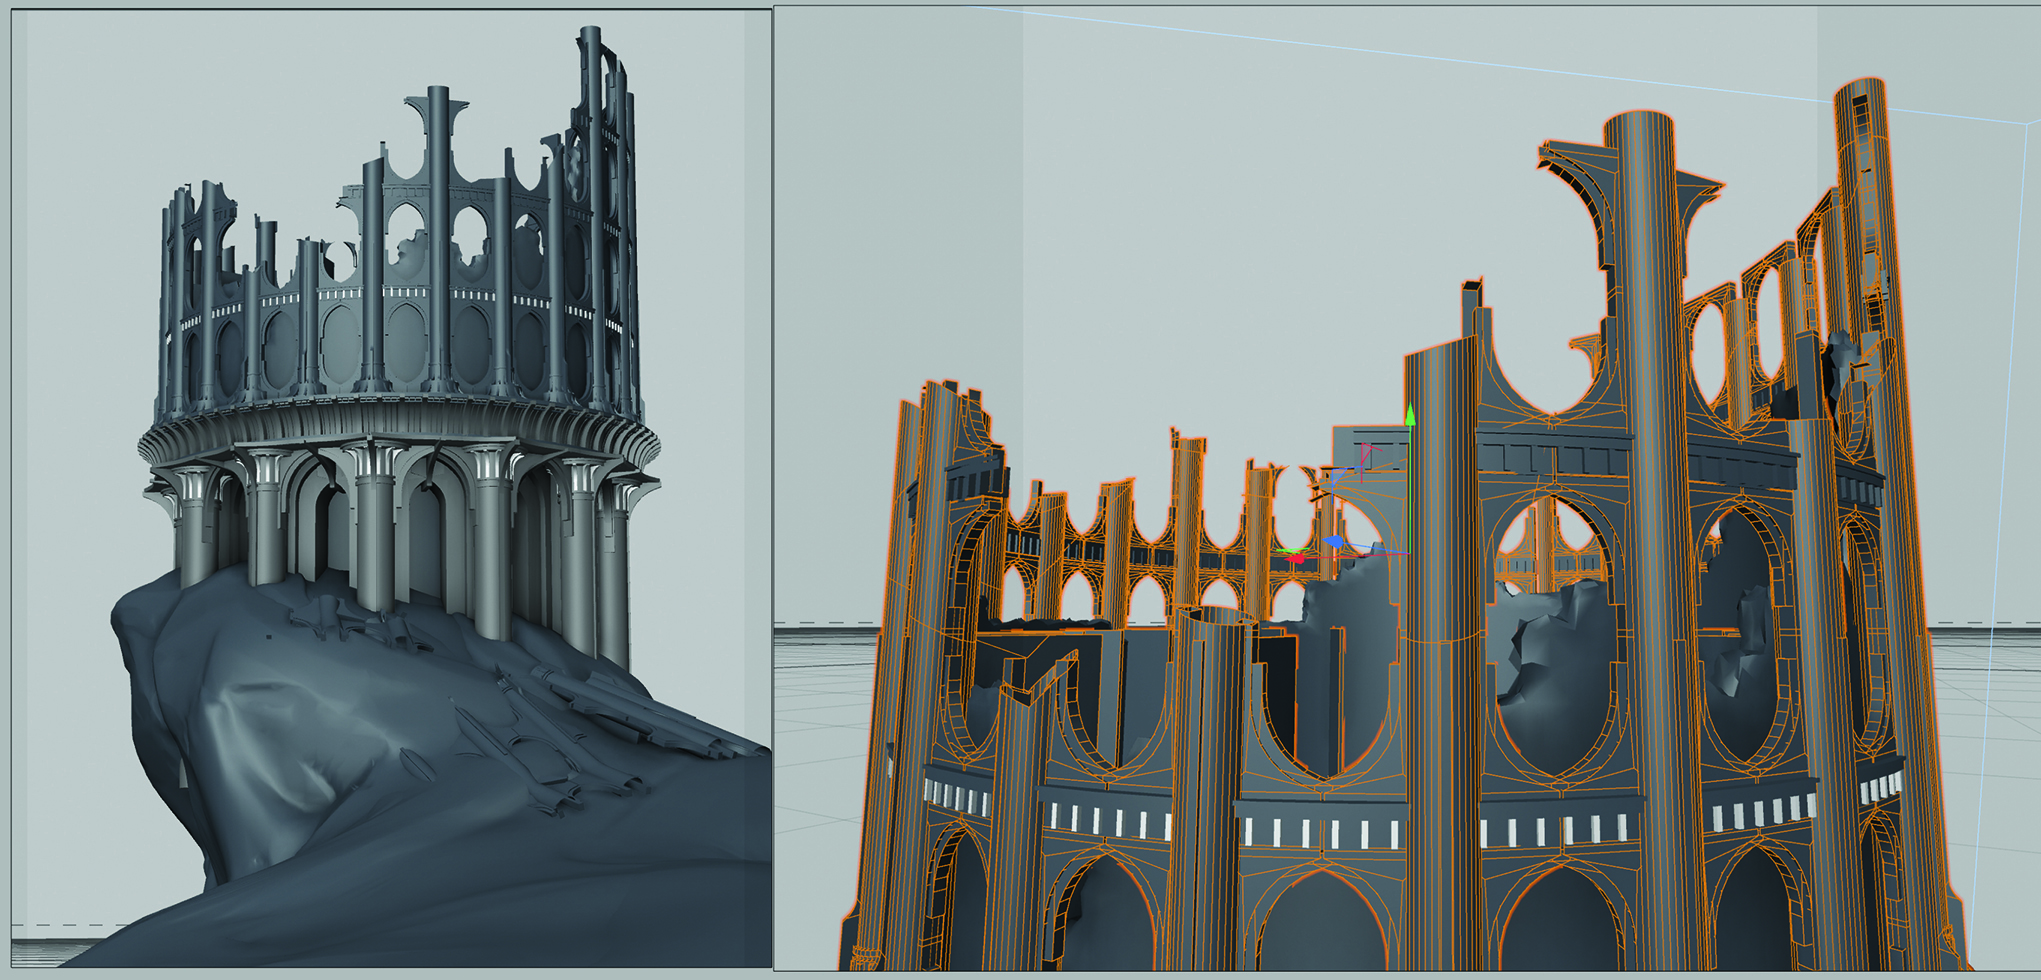
After erecting the complete architectural structure, the workflow shifts to degrading it to convey age and historical decay. Moore employs tools such as the knife tool and Voronoi fracture in Cinema 4D to slice structural cuts into the geometry. Following the original thumbnail sketch as a reference, portions of the fractured geometry are selected using lasso tools and deleted. This selective removal simulates structural collapse and weathering. Moore notes that spending dedicated time during this phase is essential for ensuring that structural fractures and missing sections look visually convincing and organic.
Digital Terrain Sculpting and Shader Layering
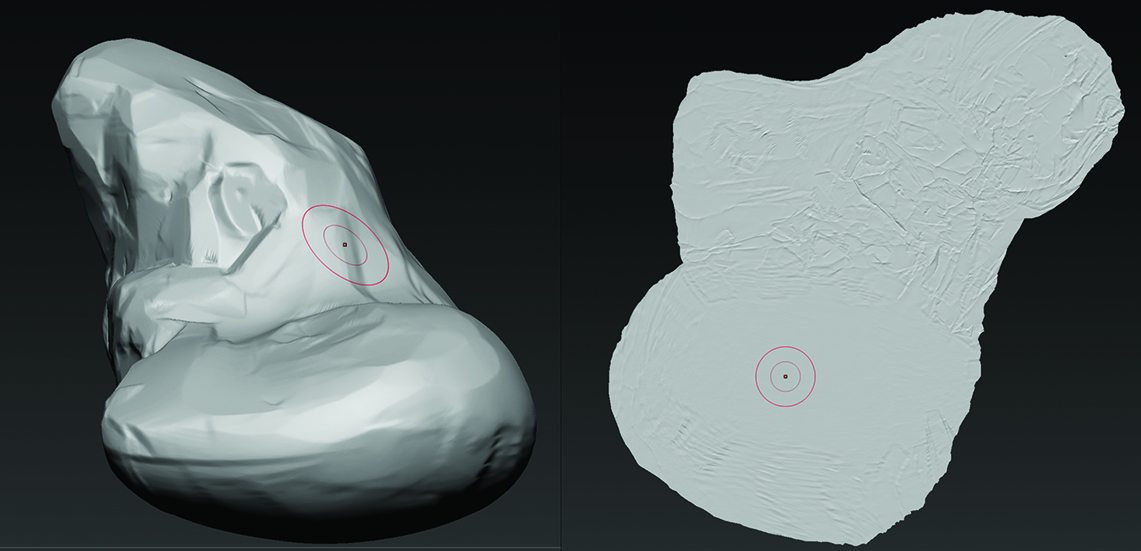
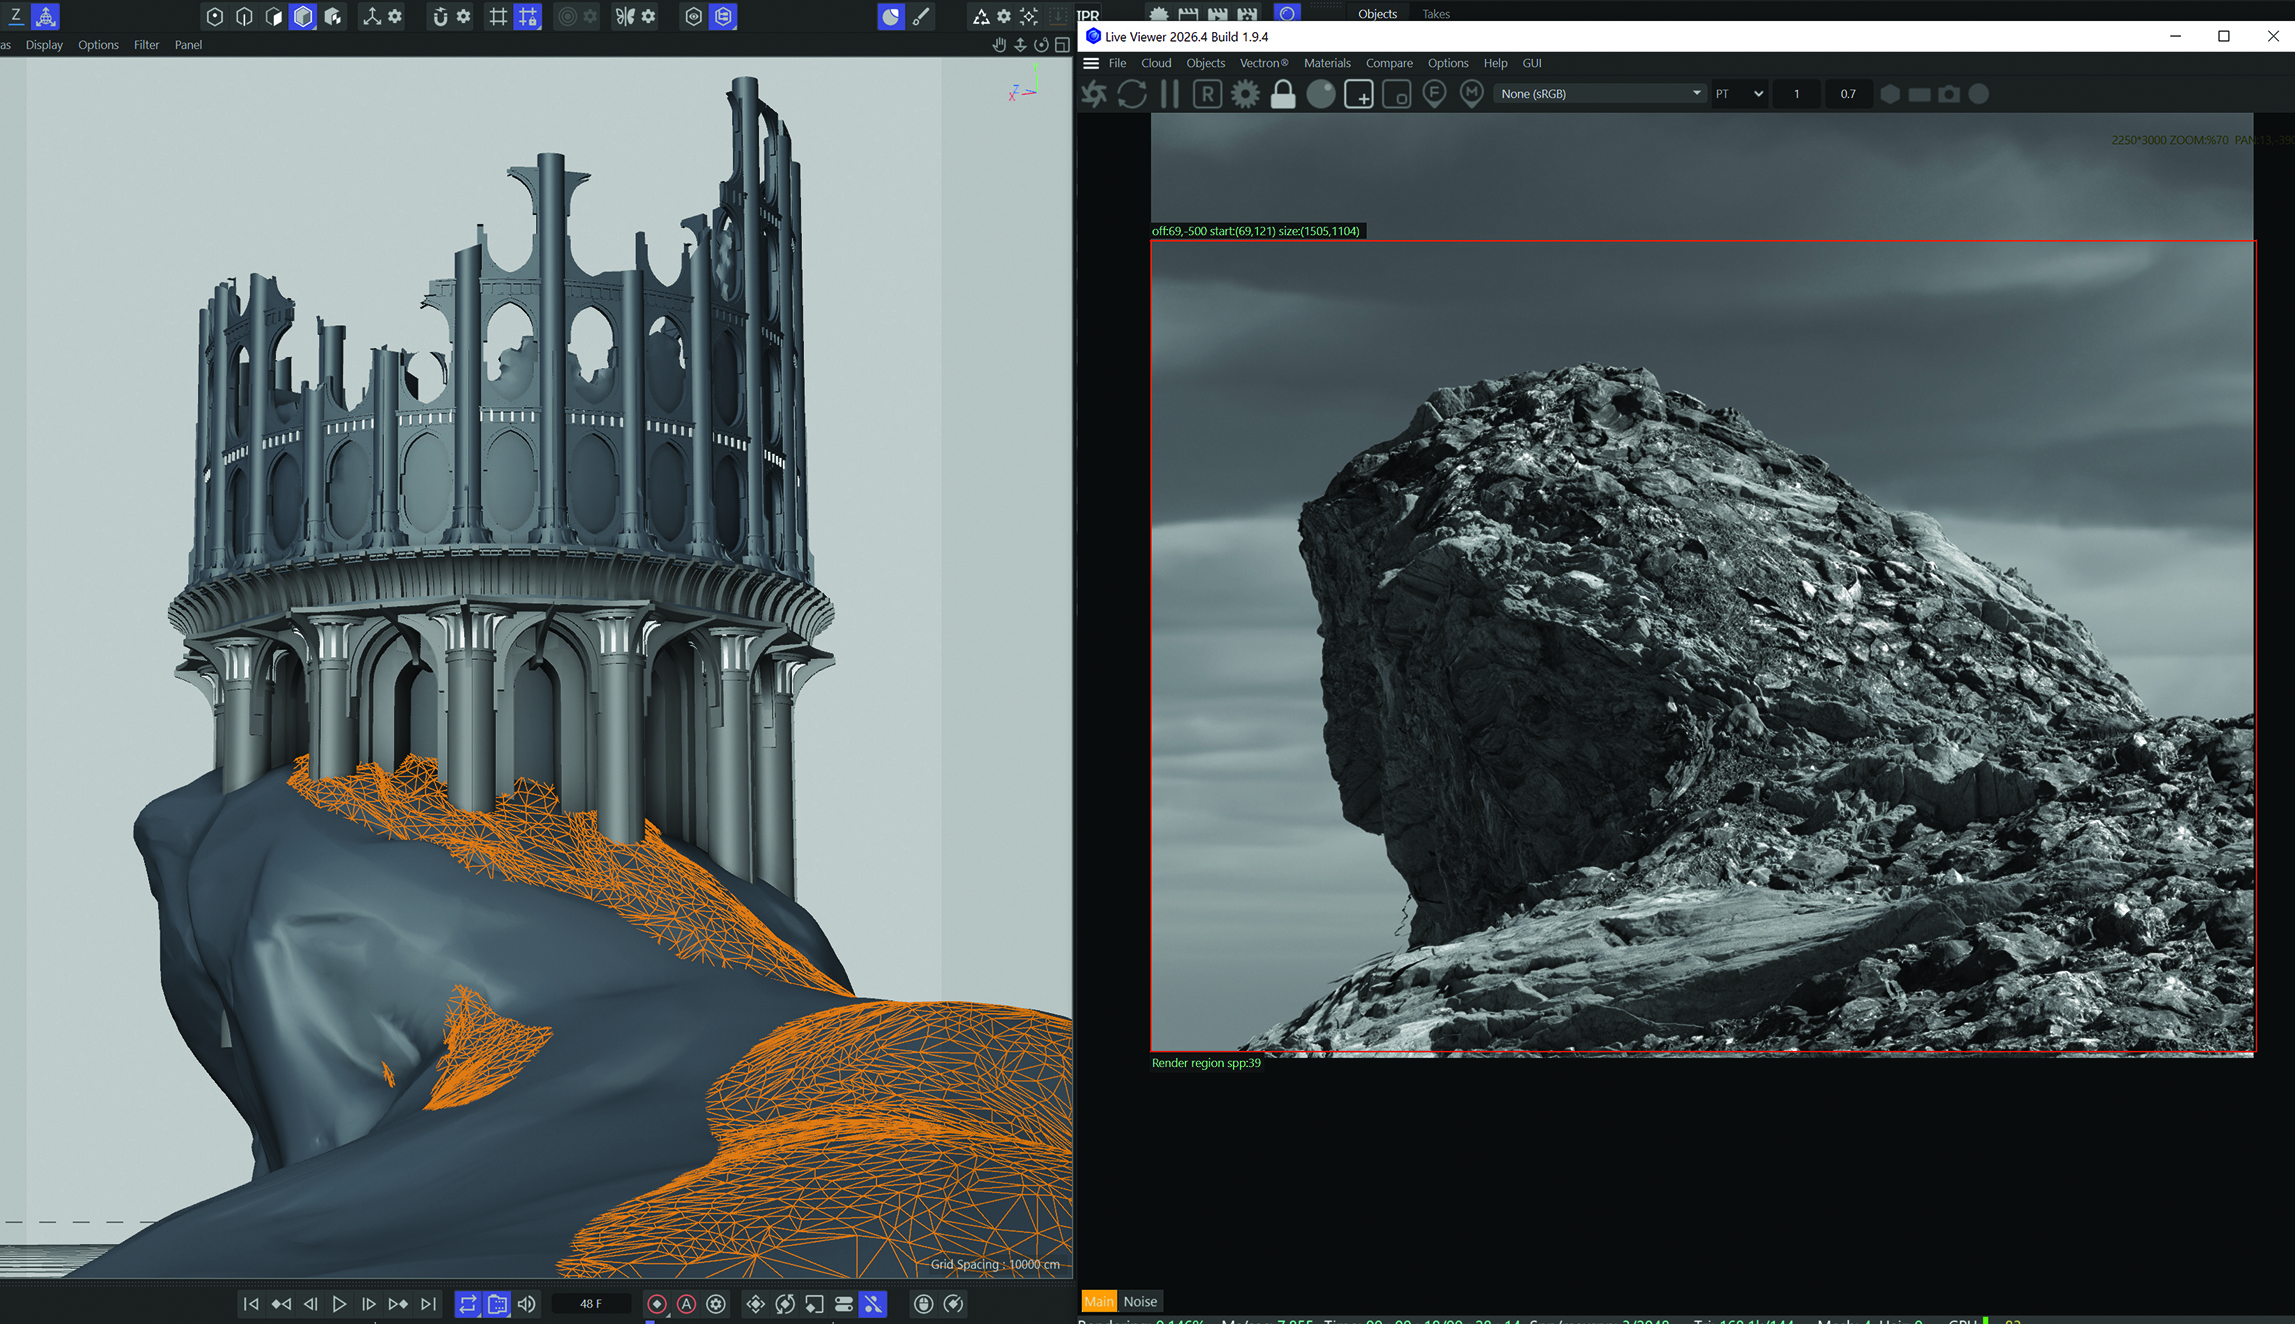
The surrounding natural environment requires a blend of high-level digital sculpting and detailed displacement shading to achieve realistic terrain forms. To model the ground, the base terrain mesh is exported from Cinema 4D into ZBrush. In ZBrush, the primary geological forms are refined, focusing on large-scale rocky shapes while deliberate restraint is exercised regarding fine surface noise, as secondary details will be handled later via displacement shaders.
Before returning the sculpt to Cinema 4D, clean UV coordinates are generated for the terrain mesh. Proper UV unwrapping is critical at this stage to prevent geometric stretching or rendering artifacts when high-scale displacement maps are applied.
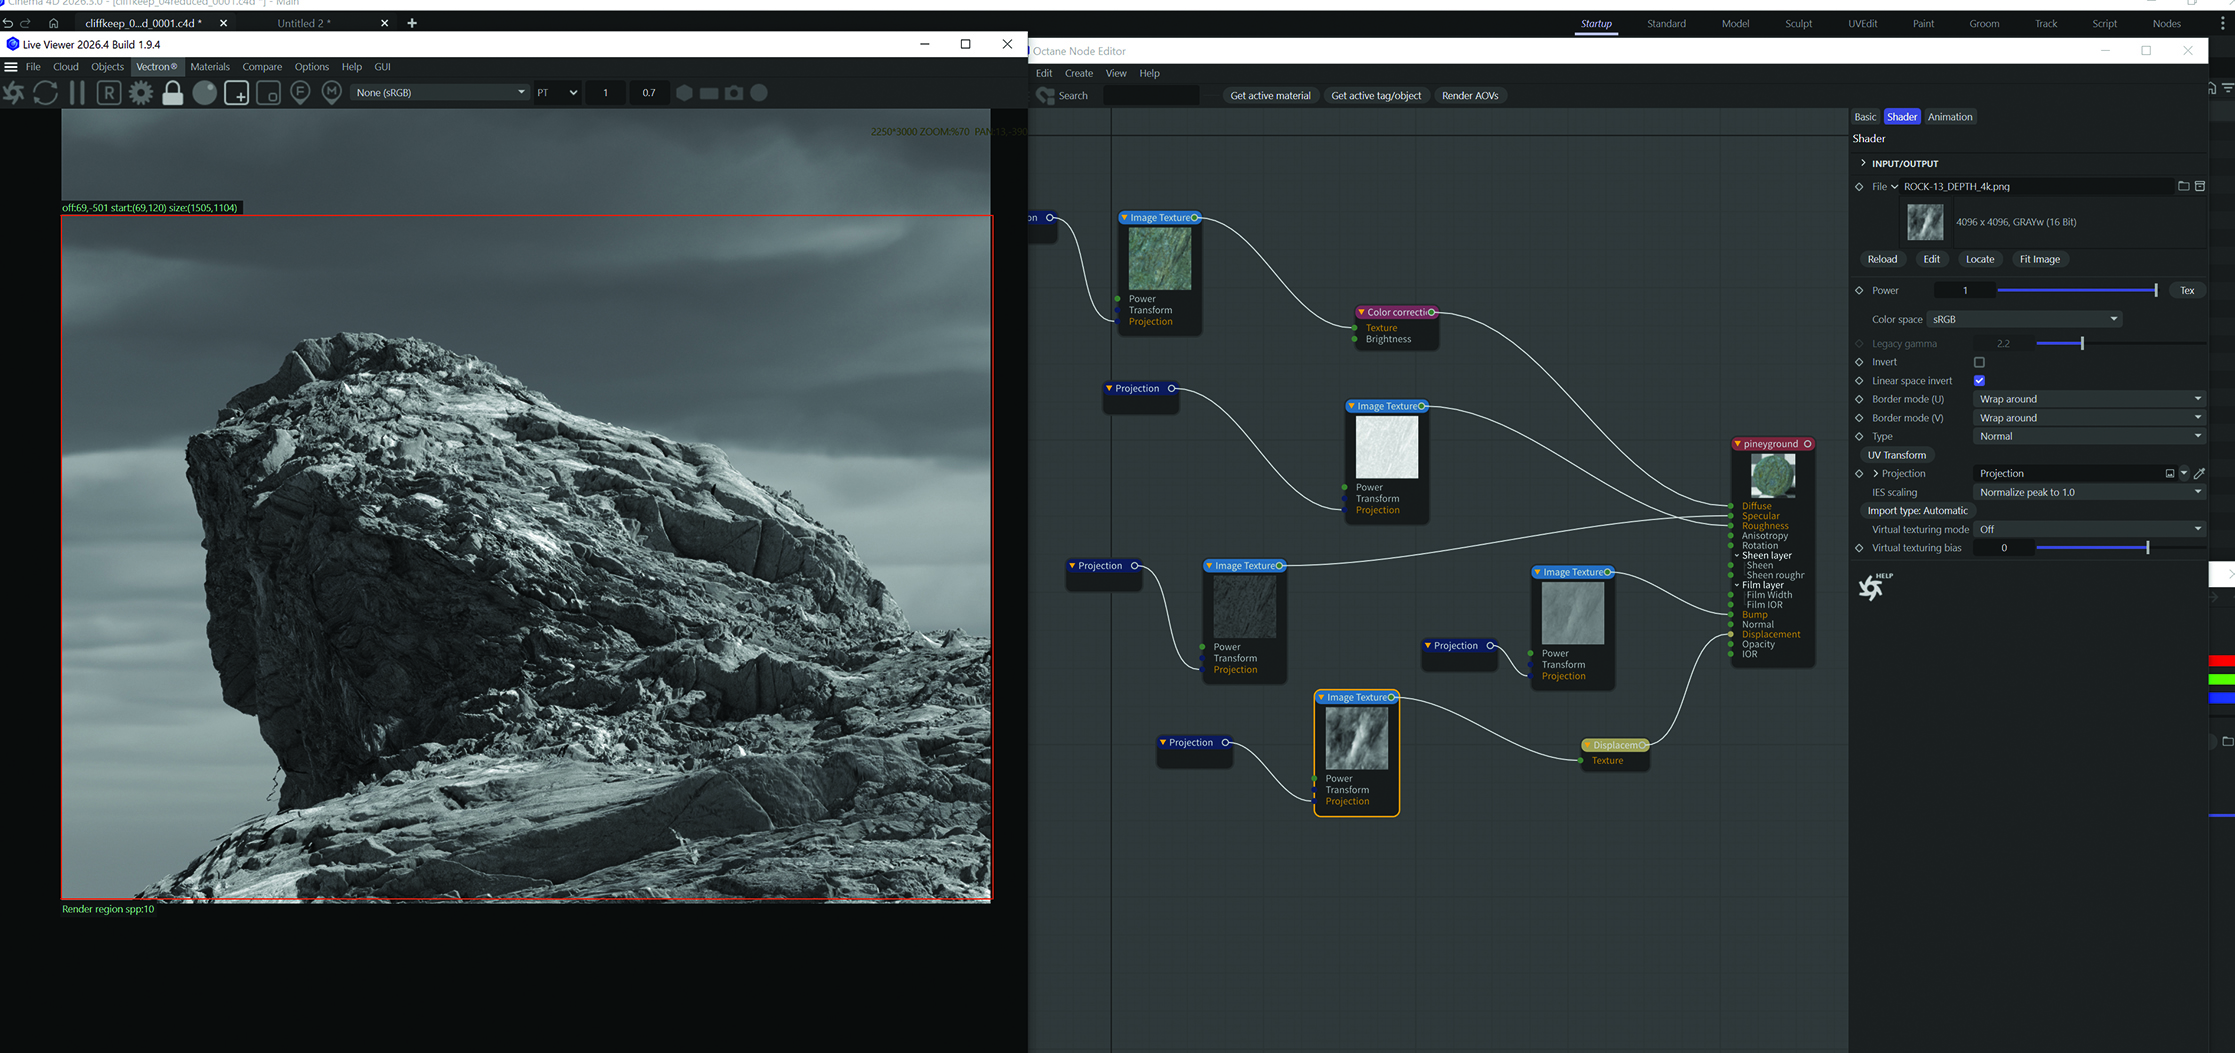
Back in Cinema 4D, surface texturing begins by applying tileable, photoscanned rock materials originally sourced from RD Textures (integrated into Megascans). By increasing the displacement intensity within the shader setup, simple sculpted surfaces take on intricate surface detail, deep crevices, and complex rock faces. Adjusting texture scaling and UV offsets allows the artist to align surface features with the camera view, refining the landscape’s silhouette.
To make the terrain feel natural, Moore implements a multi-layered material technique. Nature rarely features uniform rock faces, so the terrain mesh is duplicated and shifted slightly upward along its vertical Y-axis. Selected regions of the upper mesh are sculpted back down, and a secondary photoscanned ground and soil material is assigned to it. In the final render, this setup generates a seamless transition between vertical cliff faces and flat, soil-covered ground, simulating natural erosion and sediment build-up.
Surface Detailing, Grime Maps, and Atmospheric Lighting
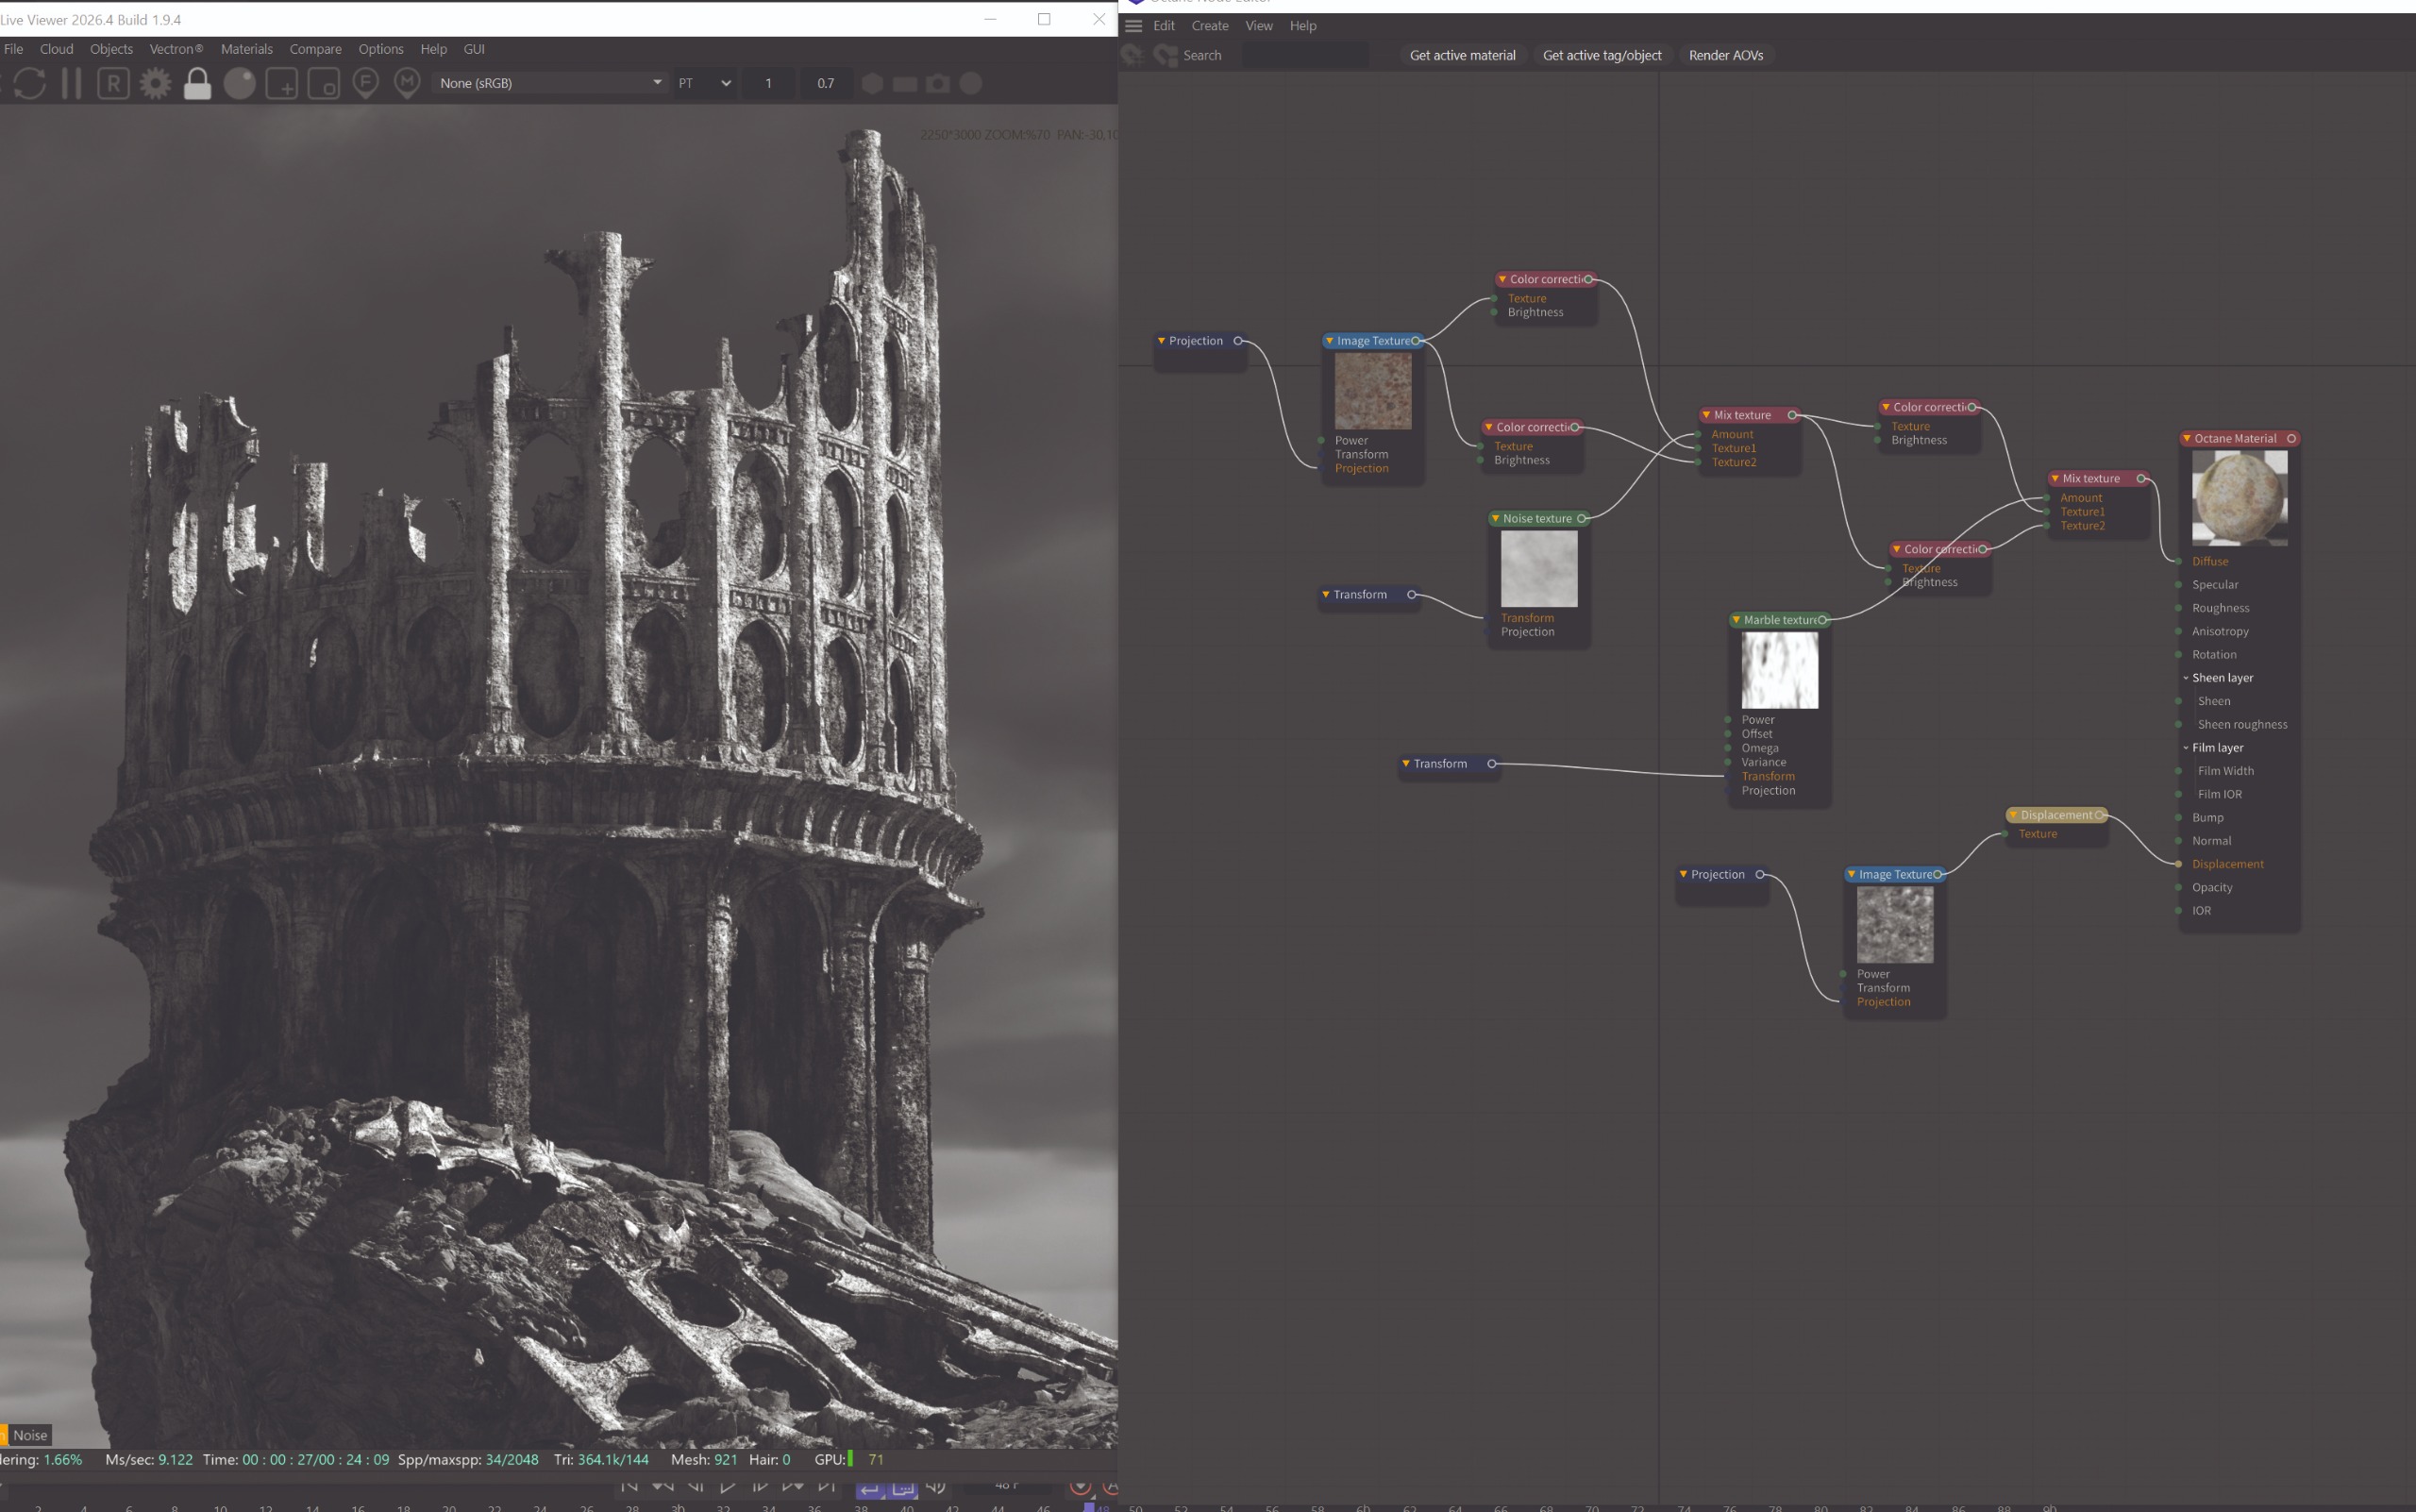
Detailing the central structure requires balancing raw stone textures with environmental wear. The tower’s base material is built using a stone wall shader driven by displacement maps, instantly projecting brick patterns onto the simple underlying geometry.
To prevent tileable textures from appearing artificial or repetitive, procedural noise shaders are introduced into the material graph to generate surface grime and color variation. By blending these noise maps with gradient marble textures, Moore concentrates weathering toward the base of the structure—mimicking the natural accumulation of moisture, dirt, and moss where the building meets the earth.
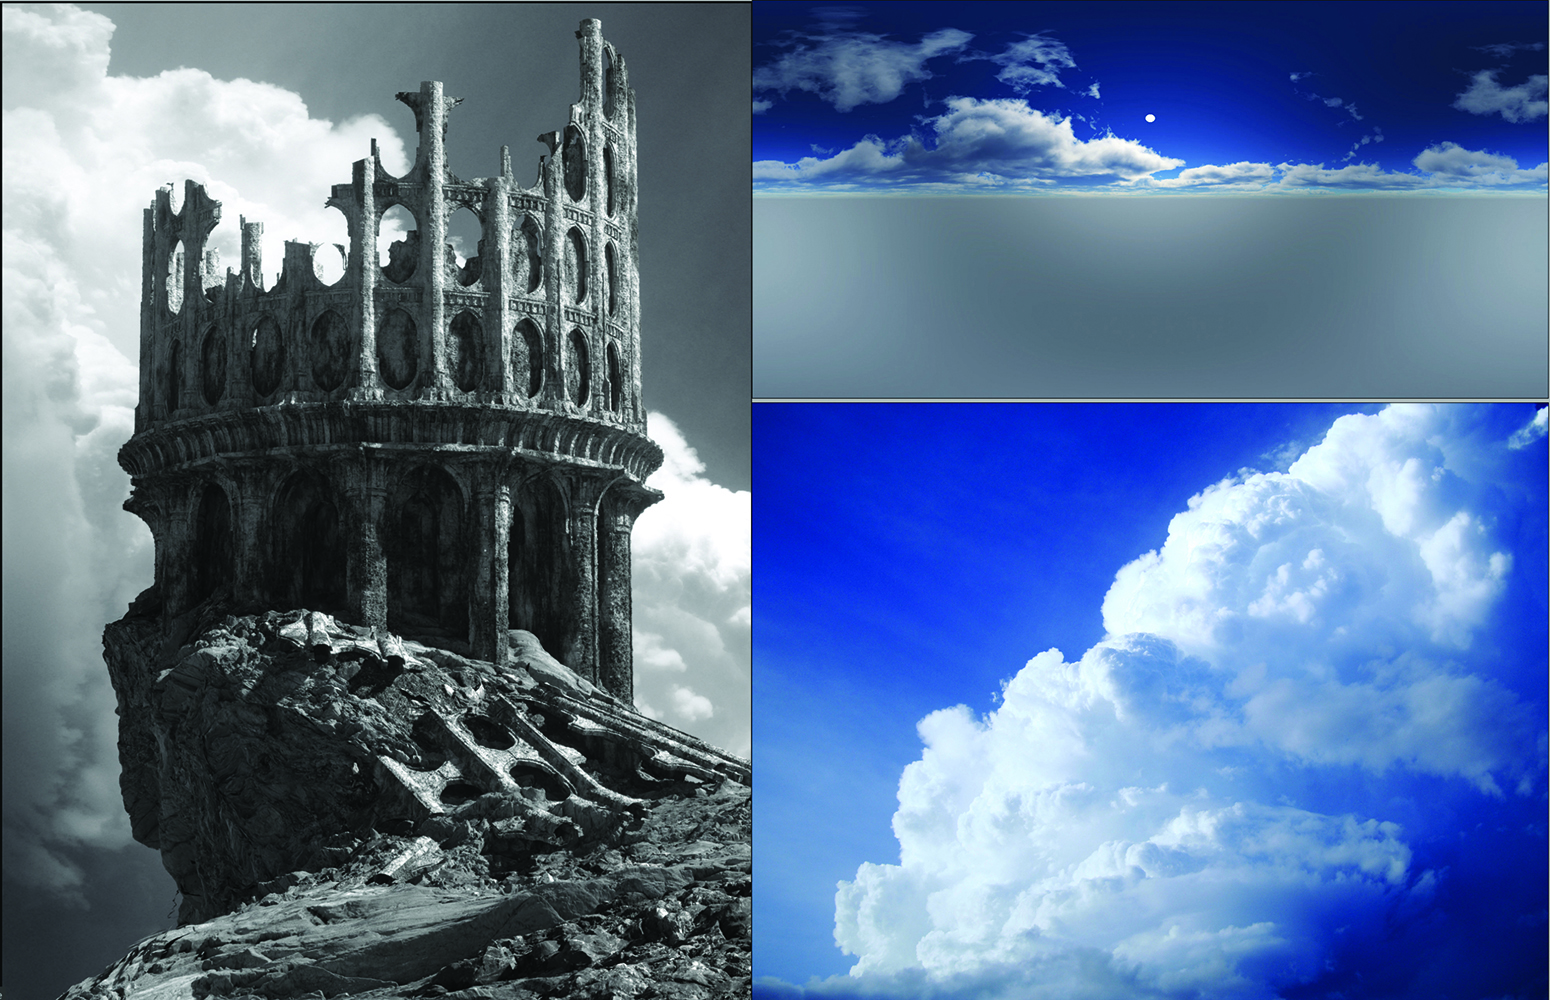
Lighting design is executed concurrently with material assignment. Environment lighting is established by testing multiple High Dynamic Range Images (HDRIs) to find an illumination scheme that enhances the scene’s mood while establishing clear light-and-shadow relationships. Contrast between light and shadow is leveraged to guide the viewer’s eye, increase spatial depth, and improve image readability.
To strengthen the overall composition, a cloud plane is placed into the scene. The cloud layer acts as a visual element that breaks up harsh structural lines, frames the focal point, and contributes to the atmospheric depth of the background.
+---------------------------------------------------------------------------+
|                        OCTANE RENDER PASS OUTPUT                          |
+---------------------------------------------------------------------------+
|  Beauty Pass    |  Z-Depth Pass     |  Bloom Pass       |  Object ID Pass |
|  (Main Render)  |  (Atmospheric Fog)|  (Highlights/Glow)|  (Element Masks)|
+---------------------------------------------------------------------------+
                                      |
                                      v
+---------------------------------------------------------------------------+
|                       ADOBE PHOTOSHOP POST-PROCESSING                     |
+---------------------------------------------------------------------------+
|  • Artefact Paintover & Edge Cleaning                                     |
|  • Depth of Field Blur on Background Geometry                             |
|  • Level & Exposure Tuning (Lifted Shadows for Vintage Aesthetic)          |
|  • Vintage Paper & Photo Overlay Blending (Vivid Light / Multiply)       |
|  • Global Film Grain Unification                                          |
+---------------------------------------------------------------------------+
Ecosystem Scattering and Render Pass Management
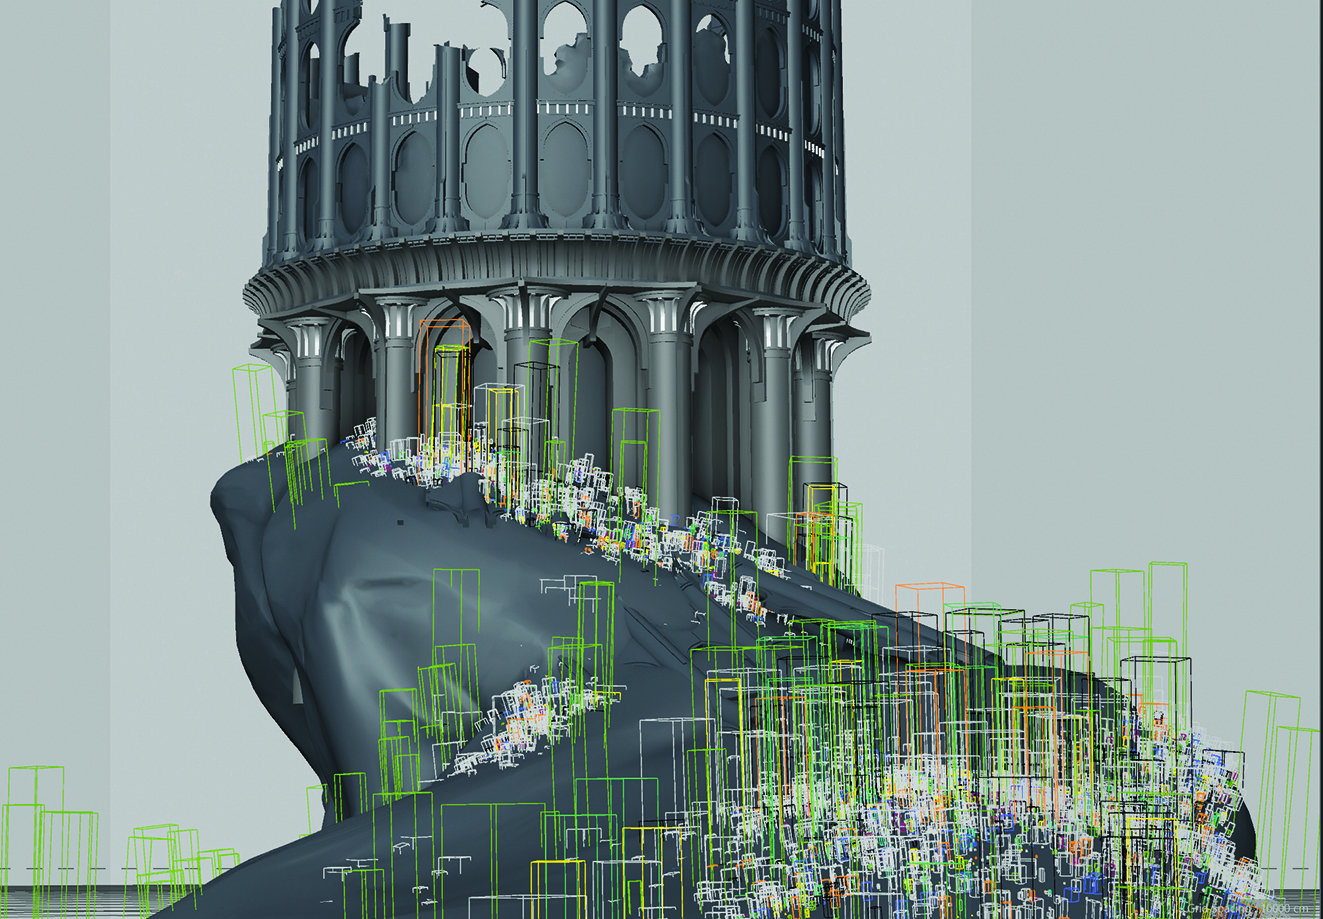
Populating the landscape with vegetation relies on automated scattering tools to manage high instance counts efficiently. Utilizing pre-built Octane Scatter systems containing models of pine trees, shrubs, and ground grasses, Moore paints custom vertex maps directly onto the terrain mesh. These vertex maps act as masks, controlling exactly where vegetation populates and keeping plants clear of solid rock faces or structural debris.
Rendering heavy nature scenes featuring dense foliage and high-resolution displacement requires careful optimization. To monitor progress without exhausting hardware resources, work is evaluated in region renders. Render settings are tuned specifically to maximize output speed while preserving geometric detail.
Alongside the primary beauty render, several auxiliary render passes are exported for post-production:
- Z-Depth Pass: Captures distance information, allowing for precise control over atmospheric fog and depth-of-field blurring in post-production.
- Bloom Pass: Isolates high-intensity lighting highlights to enhance atmospheric glow and lens interaction.
- Object ID Pass: Generates flat color masks for individual scene elements, enabling targeted color grading and adjustments without complex manual selections.
Post-Processing and Digital Paintover Finishes
The final stage of production moves out of the 3D environment into Adobe Photoshop, where render outputs are refined into a finished image. The post-processing workflow begins with a digital paintover phase. Using standard painting brushes, Moore smooths out displacement artifacts, cleans up messy geometric intersections, and hand-paints subtle brick highlights along structural silhouettes.
To enhance depth, a subtle lens blur is applied to distant sections of the tower based on the Z-Depth pass. Softening background elements prevents the image from feeling flat and draws attention toward the sharper foreground structures.
A key turning point in the project’s visual direction occurred during the lighting setup, when Moore temporarily desaturated the viewport to evaluate light values. The stark, high-contrast greyscale presentation proved more compelling than the planned color palette, prompting a permanent shift to a monochrome aesthetic reminiscent of early archival photography.
To achieve an aged photographic aesthetic in Photoshop, shadow values and exposure levels are lifted to soften pure blacks. The bloom pass is blended over bright areas to generate a soft optical glow. Finally, vintage paper textures and archival photo overlays are applied using Vivid Light and Multiply blend modes.
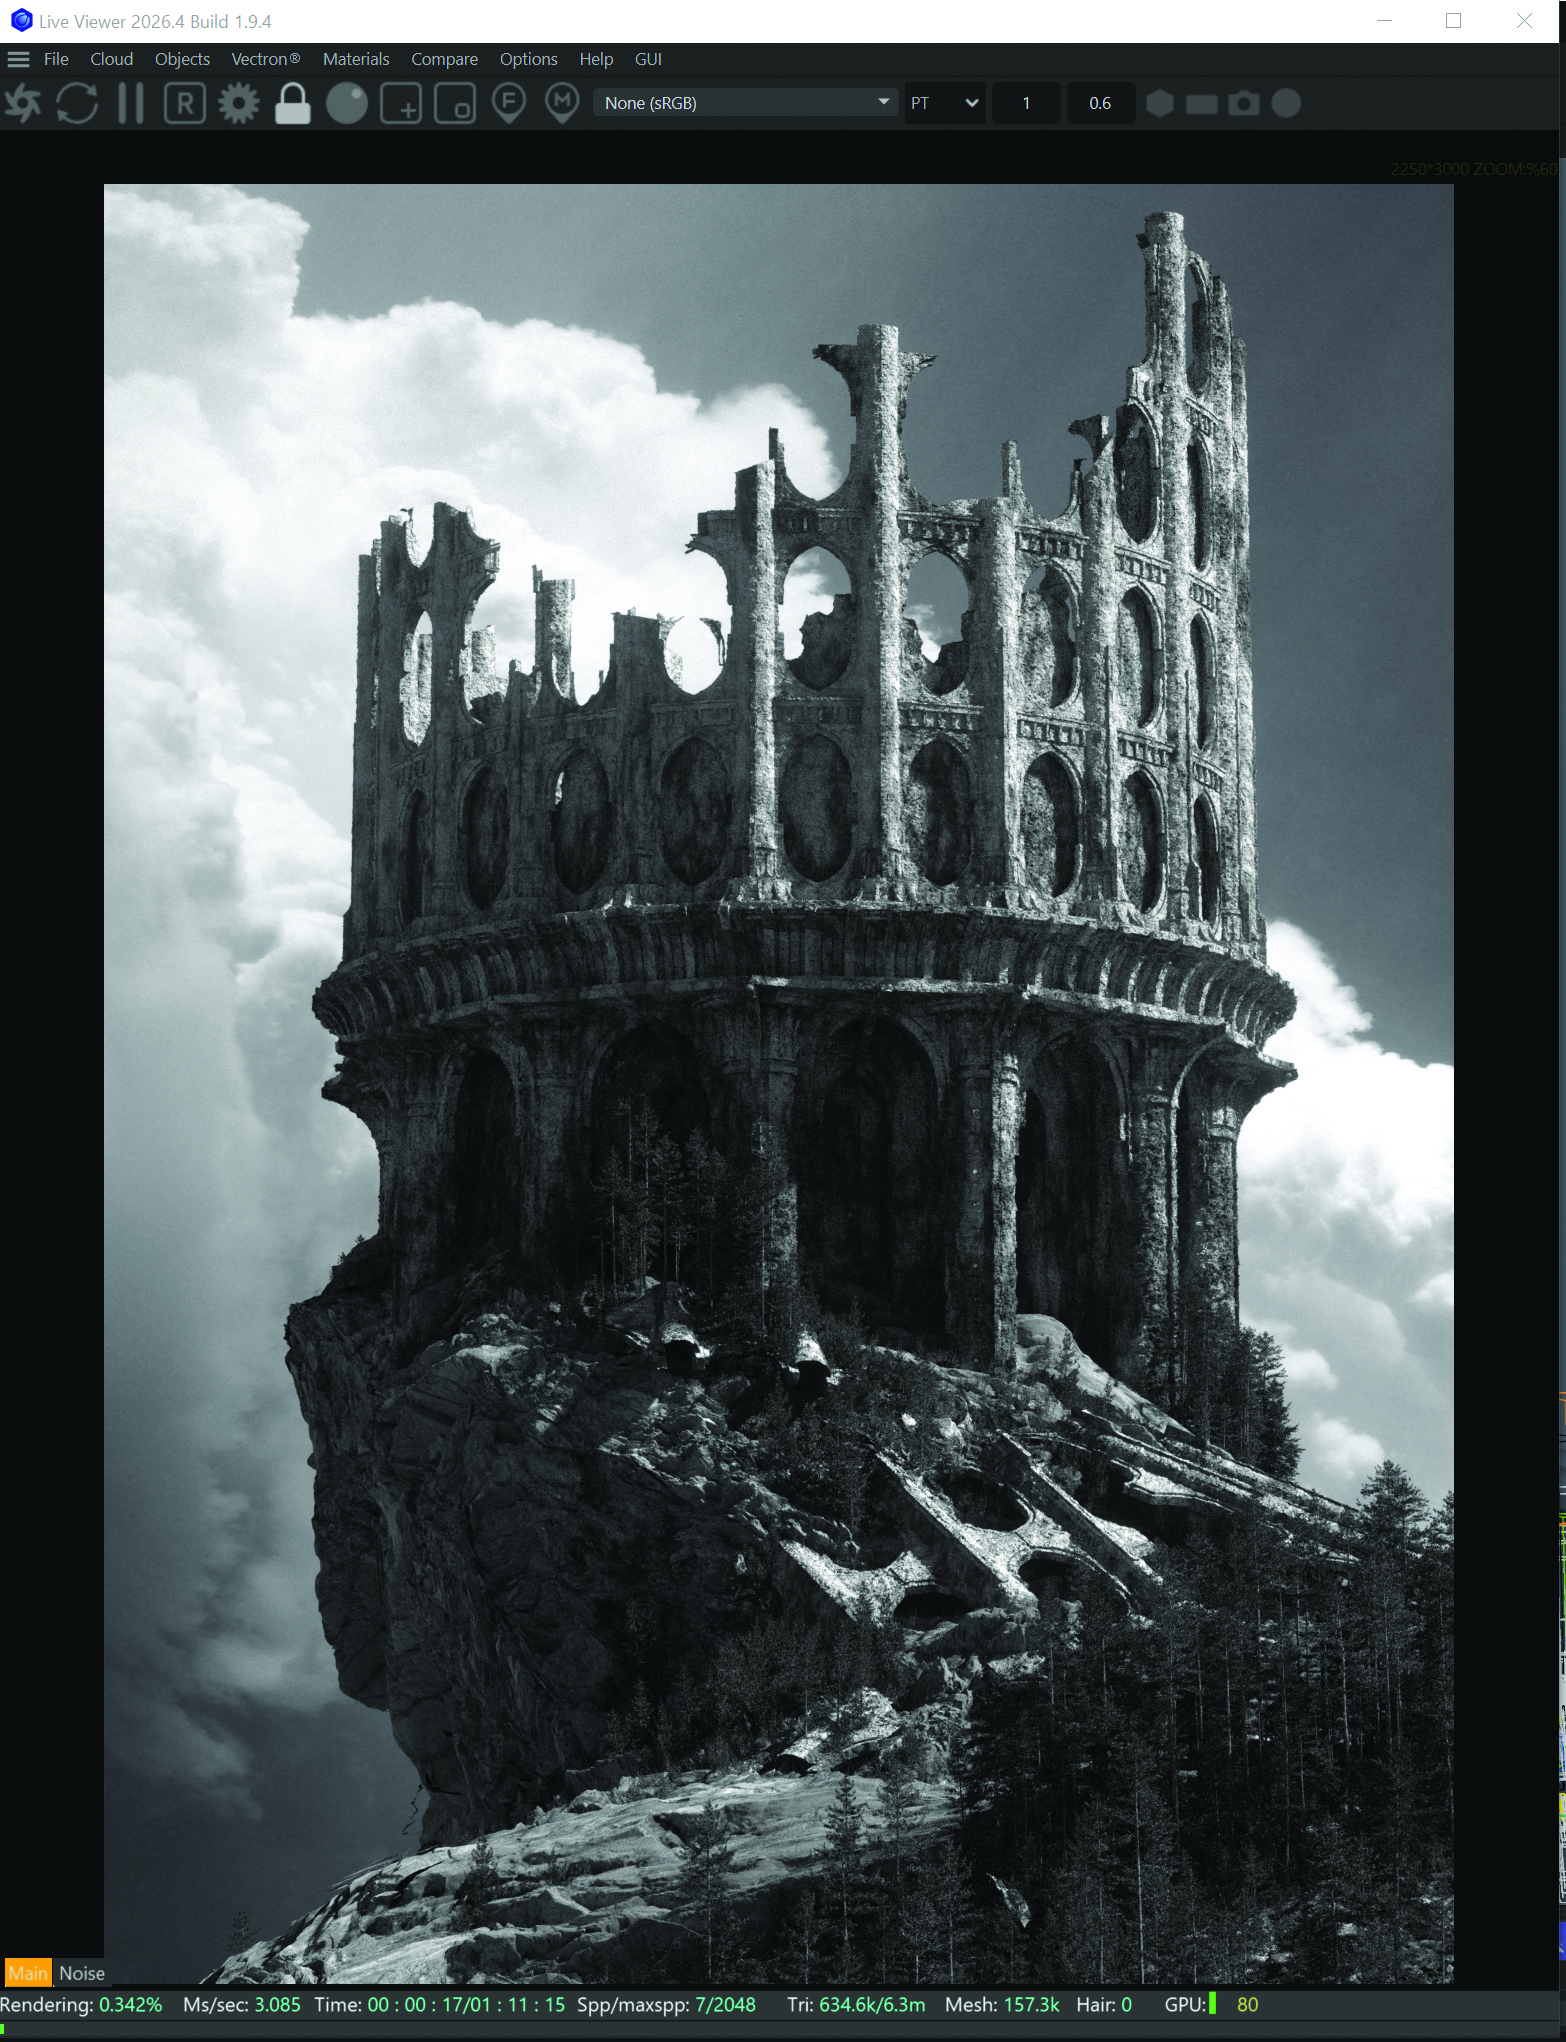
As a final unifying touch, the composite layers are merged into a single flat layer, and a global film grain effect is introduced. Adding consistent grain breaks down the smooth pixel gradients typical of 3D rendering engines, disguising its digital origin and yielding a cohesive visual finish.
Summary of Software Tools and Key Production Steps
| Pipeline Stage | Primary Software | Key Technical Operations |
|---|---|---|
| Pre-Production & Sketching | Photoshop / Traditional Media | Visual palette gathering, modular asset pre-building, thumbnail composition sketches. |
| Scene Blockout | Cinema 4D | Basic geometry blocking, terrain silhouette building, early camera angle locking. |
| Architectural Modeling | Cinema 4D | Radial cloners, symmetry modifiers, simple geo paired with high-scale displacement maps. |
| Structural Destruction | Cinema 4D | Knife tool cuts, Voronoi fracture, lasso selection and geometric removal for natural decay. |
| Terrain Sculpting | ZBrush & Cinema 4D | Primary shape sculpting, clean UV generation, Megascans/RD Textures displacement shaders. |
| Material Layering | Cinema 4D | Mesh duplication and vertical Y-offsetting to blend cliff faces with topsoil textures. |
| Vegetation & Scattering | Cinema 4D & Octane Render | Painted vertex masks driving Octane Scatter systems for pine trees, shrubs, and grasses. |
| Lighting & Rendering | Octane Render | HDRI environmental lighting, cloud planes, multi-pass rendering (Z-Depth, Bloom, Object ID). |
| Compositing & Finishing | Adobe Photoshop | Artifact paintover, background depth blur, monochrome tonal adjustments, texture overlays, film grain. |